Checkboxes in Django-Materialize
Django is a high-level Python Web framework that enables rapid development and structured design. Materialize is a modern responsive CSS framework based on Material Design by Google. When used together, Django and Materialize, one can quickly build good looking and efficient applications that work in all devices.
Here we show an example how checkboxes work in Django-Materialize framework. This is a simple task, but because of the lack of proper documentation and examples, the usage may be challenging.
First we install the django and materialize packages
$ pip install django
$ pip install django-material
$ pip install django-material
and create the initial project
$ django-admin startproject mysite .
$ python manage.py startapp main
$ python manage.py startapp main
Next we modify the settings.py file and add ’main.apps.MainConfig’ and ’material’ into it
INSTALLED_APPS = [
'main.apps.MainConfig',
'django.contrib.admin',
'django.contrib.auth',
'django.contrib.contenttypes',
'django.contrib.sessions',
'django.contrib.messages',
'django.contrib.staticfiles',
'material',
]
'main.apps.MainConfig',
'django.contrib.admin',
'django.contrib.auth',
'django.contrib.contenttypes',
'django.contrib.sessions',
'django.contrib.messages',
'django.contrib.staticfiles',
'material',
]
In models.py, we create a class that contains the fields of the checkbox
from django.db import models
class Check_Form(models.Model):
FieldA = models.CharField(max_length=10)
FieldB = models.CharField(max_length=10)
FieldC = models.CharField(max_length=10)
class Check_Form(models.Model):
FieldA = models.CharField(max_length=10)
FieldB = models.CharField(max_length=10)
FieldC = models.CharField(max_length=10)
Next we create a new file forms.py, which uses the material design form class. Here we also define the checkbox content and layout.
from django import forms
from .models import Check_Form
from material import Layout, Fieldset, Row
class Web_Form(forms.Form):
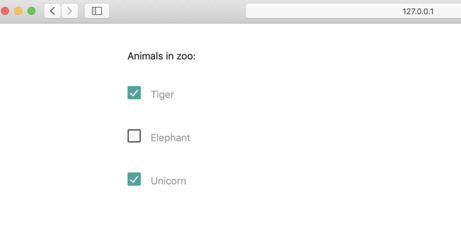
animalA = forms.BooleanField(required=False, label='Tiger')
animalB = forms.BooleanField(required=False, label='Elephant')
animalC = forms.BooleanField(required=False, label='Unicorn')
layout = Layout(Fieldset('Animals in zoo:'),
Row('animalA'),Row('animalB'),Row('animalC'))
In file views.py we render the homepage. As an example how to pre-populate the checkbox fields, we call the Web_Form defined in forms.py and access to checkbox values with a dictionary.
from django.shortcuts import render
from .forms import Web_Form
def homepage(request):
Tigers = True
Elephans = False
Unicorns = True
form = Web_Form(initial=dict(animalA=Tigers,animalB=Elephans,animalC=Unicorns))
return render(request = request,
template_name='main/homepage.html',
context = {'form':form })
from .forms import Web_Form
def homepage(request):
Tigers = True
Elephans = False
Unicorns = True
form = Web_Form(initial=dict(animalA=Tigers,animalB=Elephans,animalC=Unicorns))
return render(request = request,
template_name='main/homepage.html',
context = {'form':form })
What remains, is the small change in the urls.py files. The urls.py (mysite) is
from django.contrib import admin
from django.urls import path, include
urlpatterns = [ path("", include('main.urls')),
path('admin/', admin.site.urls),
]
from django.urls import path, include
urlpatterns = [ path("", include('main.urls')),
path('admin/', admin.site.urls),
]
and urls.py (main) takes the form
from django.urls import path
from . import views
app_name = "main"
urlpatterns = [ path("", views.homepage, name="homepage"), ]
app_name = "main"
urlpatterns = [ path("", views.homepage, name="homepage"), ]
Finally, we provide an example of the homepage.html. Here we first import and load the materialize CSS and javascript, and then show the pre-populated checkbox form.
<!-- Compiled and minified CSS -->
<link rel="stylesheet" href="https://cdnjs.cloudflare.com/ajax/libs/materialize/1.0.0/css/materialize.min.css">
<!-- Compiled and minified JavaScript for Materialize CSS -->
<script src="https://cdnjs.cloudflare.com/ajax/libs/materialize/1.0.0/js/materialize.min.js"></script>
{% load material_form %}
<br>
<form method="POST" >
{% csrf_token %}
{% form form=form %}
{% endform %}
</form>
The end result of this example looks like the following:

More information about the Materialize checkbox colors, shapes and details can be found here .
Back to the main page.